All posts in 2010

Plug Bug: Rear Battery Box
Don’t forget about the original design: http://www.corbinstreehouse.com/blog/2010/12/plug-bug-battery-box-design/ I did modify it slightly as I went along. I learned a lesson from the front box: add 1/8″ or so to the total length to avoid it... [read more]
Dec
30
2010
Plug Bug: Front battery box fabrication
I’ve been working on fabricating the battery boxes out of 1/8″ steel angle iron and flat stock for the past two weeks. The first step was to strap them together to get an accurate measurement... [read more]
Dec
30
2010
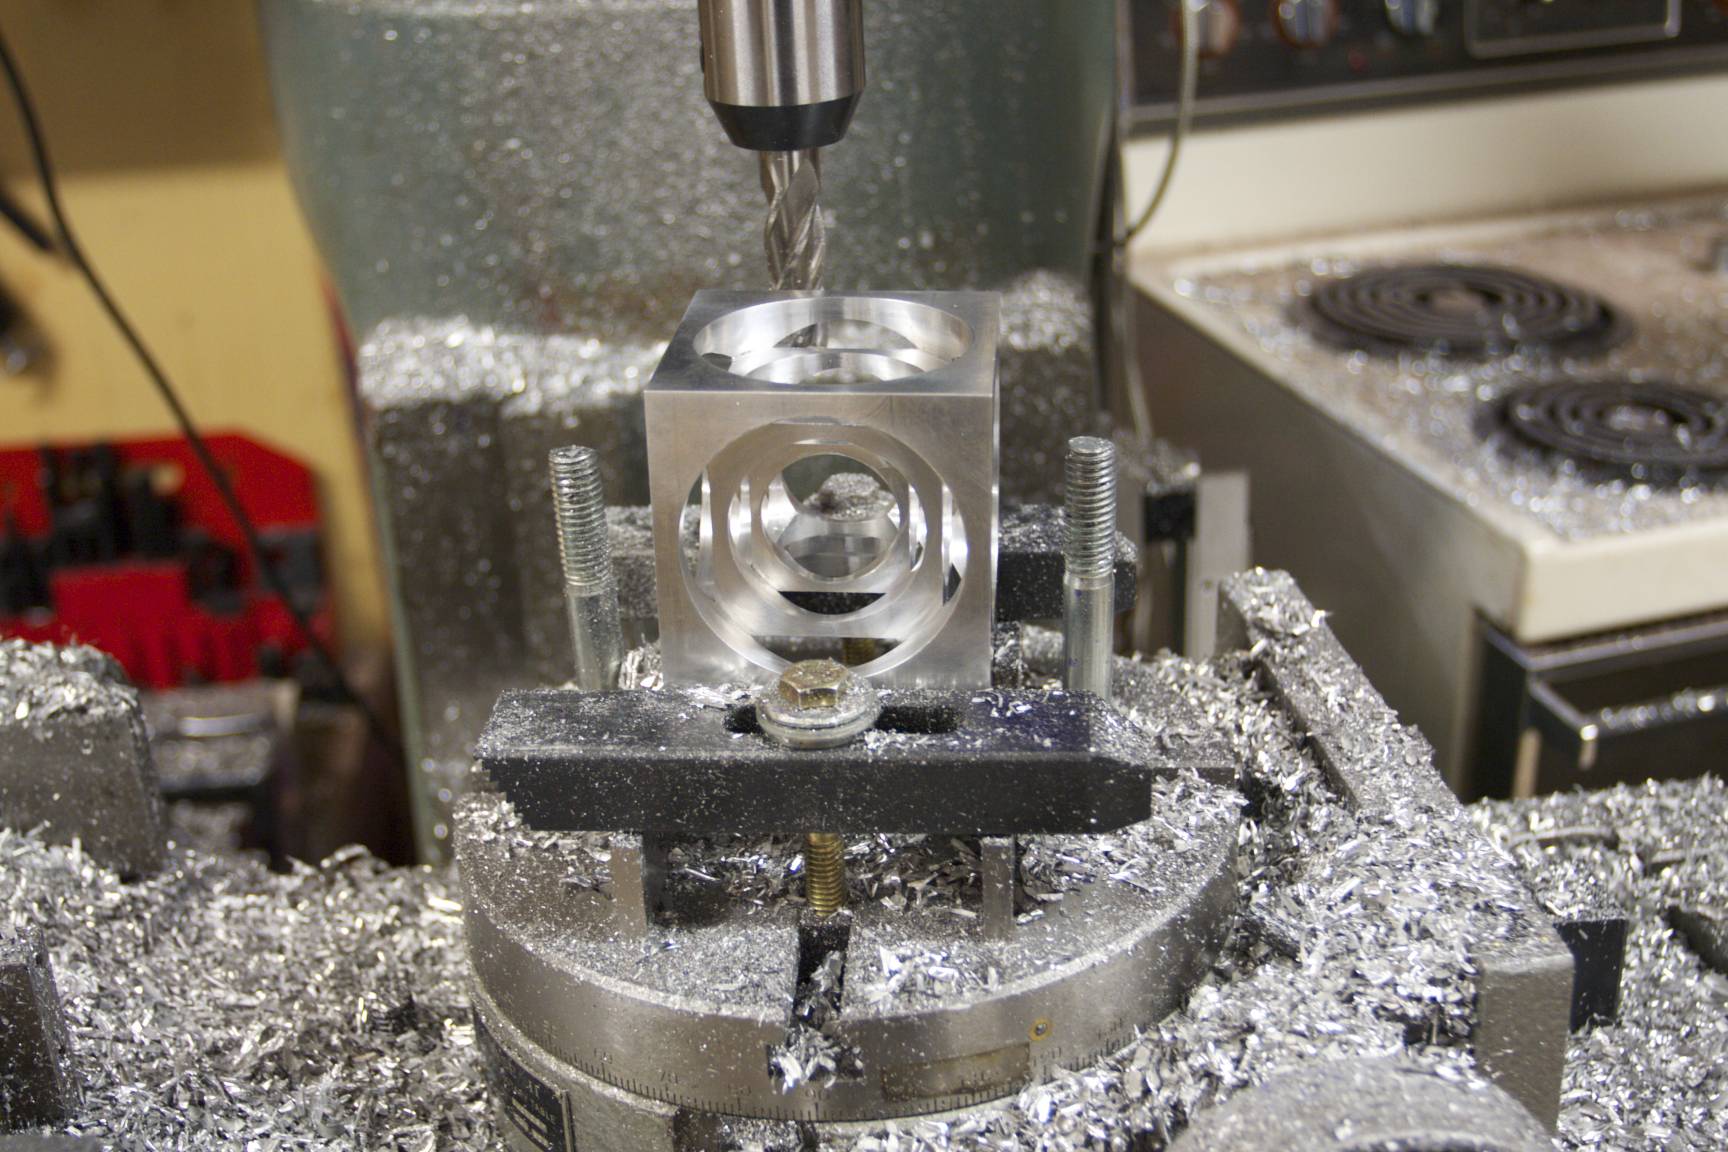
Turner’s Cube
Tuner’s Cube. I made it for my dad for Christmas 2010. Aaron helped me over Thanksgiving break to figure out the details and did some machining on it too. It started out as a ~3.5″x3.5″... [read more]
Dec
27
2010
Metalwork: Wine Glass Rack
Here’s a wine glass rack I made for my dad’s wife, Karen. I made it a while ago, but it was a Christmas present, so I couldn’t post it till after the 25th. It is... [read more]
Dec
27
2010
Plug Bug: Strapping Thundersky batteries together
Here’s how I strap the Thundersky batteries together. As previously mentioned, I bought the Mini Polyester Strapping Kit 5/8″ x .040″+seals + tools for $80 (plus shipping) on ebay. The pack of 4 (or 5)... [read more]
Dec
23
2010
Plug Bug: Weight Distribution
The unladen weight of the stock bug is 1807 lbs. The gross vehicle weight is 2645 lbs. Front axle load: 1080 lbs, rear: 1609 lbs. The front axle had the 10.6 gallon tank removed —... [read more]
Dec
22
2010
Plug Bug: Battery Box Design
I did some research on what people have done for battery boxes. The cells need to be contained well so they don’t go flying around in the event of an accident. A few interesting posts... [read more]
Dec
19
2010
Plug Bug: Batteries Arrived!
I’m a little behind on the status of the project…I got the batteries on Dec 8th, but was really busy that week due to Louise’s show, Left of the North Pole. It was a pain... [read more]
Dec
19
2010
Plug Bug: Gas Gap Sticker
My batteries are in California! I just need to have the guy call me to pick them up. I’m dying to get them and put the car together, but in the meantime here’s what I... [read more]
Dec
4
2010
Plug Bug: Stereo
I wanted to have a good sound system in the car. I bought an Alpine stereo and a set of speakers. I was initially going to mount them in the doors, but I read that... [read more]
Dec
2
2010
Plug Bug: Auxillary 12 v Battery
A typical gas powered car has a large 12 volt battery mainly for the purpose of turning the engine over during starting. That usually takes a lot of amps to crank it over. Since my... [read more]
Dec
2
2010
Tricycle
Tricycle From the back of Justin’s Shop (ebikes.ca), Vancouver, BC, Canada. 2010.
Nov
7
2010
Plug Bug: iPad mount
It’s raining today but I did add a cool option to my car. The iPad mount! I was originally going to make my own mount, but that would take days of machining time and would... [read more]
Nov
7
2010
Plug Bug: Electric Ceramic Heater
I got my heater installed; I can test the fan and make sure the contactor comes on, but heat won’t come out until I actually have my battery pack installed. I cut a hole on... [read more]
Nov
7
2010
Plug Bug: Wiring…and more wiring
I’m still waiting for batteries, but i’m getting a lot of the little details done. The car could be drivable if I actually had a battery pack. I can turn on the key and hear... [read more]
Nov
4
2010
Plug Bug: Wires and Hoses
More progress tonight. Here’s aluminum L angle pieces to mount the radiator on. I slotted the car with a 4.5″ angle grinder (plus a cut off wheel) to keep the L shape and make the... [read more]
Oct
18
2010
Plug Bug: Motor backing plate + Controller
The project is moving along slowly. I was pretty busy with other things last week and didn’t get much time to work on it. I wanted a 1/8″ sheet of aluminum to back the motor... [read more]
Oct
17
2010
Plug Bug: Interface Module Installed
I worked on the bug a bit yesterday but didn’t get much done; things go slow! I ordered a Heater Kit from Canadian Electric Vehicles – http://www.canev.com/KitsComp/Components/Heater.html — the easiest way to do a heater... [read more]
Oct
10
2010
Plug Bug: Motor Installed
Last weekend was a big weekend for the project. My buddy Aaron, who has a lot of home-built EV experience and now works at Tesla came over to lend me a hand. He brought over... [read more]
Oct
5
2010
Plug Bug: Wheel and Rim
A quarter shot of the bug with the painted wheels, white walls and new dome style hubcaps (from CIP1):
Oct
5
2010
Plug Bug: Seats Upholstered
Not much to say, but I got a bunch of the rust off of the seats, fixed some broken parts, painted them and then put them back together with new foam. I got new seat... [read more]
Oct
5
2010
Kika the Bengal Kitten
We got a new kitten! This is Kika, a marble colored Bengal. I miss Piper, our Siamese a lot. She has yet to come home. I told Louise I didn’t want a new kitten to... [read more]
Sep
24
2010
Purple KH 26 Unicycle
I recently spent some time powder coating some of my unicycles. Here’s my Kris Holm 26″ Mountain Unicycle with a Schlumpf geared hub, 2.3″ tire, and the KH handlebar: I powder coated the frame translucent... [read more]
Sep
22
2010
Plug Bug: Wheel Selection
My rims started out like this, with a bunch of rust on the sides and white painted part: I thought it wouldn’t be too hard to clean them up, but I was wrong! After some... [read more]
Sep
14
2010
Vancouver Muni Weekend 2010
I had an awesome time at the “California” muni weekend, hosted in Vancouver, BC, Canada, by the VanUni unicycling club and dubbed the Vancouver Muni Weekend. It was announced via the Unicyclist forums. Here is... [read more]
Sep
14
2010
Plug Bug: Turning the flywheel
An electric motor doesn’t need a big flywheel to keep the engine running. It also doesn’t need the starter gear teeth around the edge. In fact, all it really has to do is engage with... [read more]
Sep
11
2010
Zip Line Information
I’ve had a few questions on where I got my zip line stuff. Here’s what I got: 1. Petzl Tandem Speed Pulley 30113 – $ 79.95 from http://karstsports.com/, free shipping. 2. From ZipLineSupplies.com I ordered... [read more]
Sep
10
2010
Unicycle ride: Mr Toads and Hole in the Ground
Last weekend when my cat disappeared I was busy having fun doing some mountain unicycling. I might as well remember the good stuff. Saturday a group of us rode Mr Toads Wild Ride as a... [read more]
Aug
31
2010
Missing Siamese Cat
Please help! My cat Piper is missing. She is a siamese, with white snowshoe paws. She is a polydactyl (extra toes) and is fixed. She comes to the name Piper (when she feels like it).... [read more]
Aug
31
2010
Plug Bug: Speedometer Repair
The speedo in the bug was broken. Ed, who I bought the car from, said it was just the cable that needed replacing and that he had replaced it a few times. I suspected something... [read more]
Aug
22
2010
As an Amazon Associate I earn from qualifying purchases.
(c) 2008-2025 Corbin Dunn
Subscribe to RSS feeds for entries.
45 queries. 0.226 seconds.