Custom CNC Kitchen Soap Dish Drainer from Solid Aluminum
I’m pretty excited about this project: a custom soap dish with a redwood tree embossing!
I recently got a used Tormach PCNC 1100 and this is the first “real” project I made on it. The first thing I did was a Turner’s cube to get the basic feel of stuff.


I bought some scrap 6061 aluminum from Sim’s Metals in San Jose. They sell it for $2/pound and I got a $50 chunk; more than enough to make 3 or 4 of these things. I wanted to have some extra in case I messed up. It was roughly 1” thick, by 10” by 5”.
Once I had the rough stock, I used the dimensions to sketch a model in Fusion 360. I’m happy to email it to anyone who wants; hit the Contact page and find my email and send me a message.
I have a lot of HSS end mills from my manual mill. Apparently the Tormach likes fast speeds and smaller carbide bits, but I wanted to start with what I had on hand.
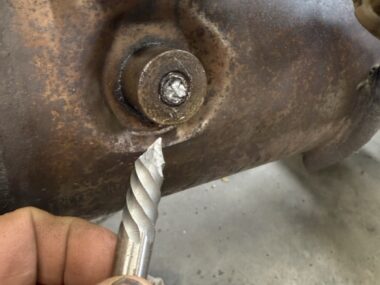
I mounted the rough stock in my vise, and flattened the top with a modular face mill that came with my machine. It is 1.5” and eats through aluminum. I then used it to rough out the majority of the stock on the inside area. This left some pretty big round corners, and I should have realized that when I did the CAM for the final passes, but I didn’t think about it till it was too late. I put in a 7/16 HSS center cutting end mill and did the outside profile. The corners bogged down a bit; I later learned I needed multiple passes. Oh well! I then tackled the inside area, and the thick corners really bogged down the bit; so much that it really worried me, and I manually turned down the feed to ~1-2 IPM. This safely got it through. I then used a 3/16” HSS end mill for doing the grooves and rouging out the tree. A 1/16” end mill was used to finish the tree; this took a good 40 minutes or so. Finally, the top was rounded with a ?” ball end mill. Lots of learning going on here for me, so my notes aren’t really a recipe for how to do this!
I wanted to have the whole thing have a slight forward tilt to allow water to drain out. My plan was to 3D mill the underneath and have it be a little rough. I flipped the part and had a lot of trouble mounting it back in the vice. I should have used the “superglue” technique to hold it down, but I wasn’t quite ready to try that. I ended up getting it in the vice okay enough with some parallels, but I had to stick one side out a bit. This accidentally propped the front up higher than the back, and I didn’t notice. I used the face mill to take off the top, and it bogged down a lot in the front section; I knew something was up and it was taking off more than it should. I was committed to it at this point, and just went with it; it turned out this was perfect; it milled a nice tilt to it, and it is probably the way I should have done it to begin with! After a final profile pass I was done with the machining.
I wanted the embossing to stand out, so I powder coated the bottom a bit and then sanded off the overspray area with a random orbital sander and 150 grit paper. This looked nice and matte, so I did the rest with it. I couldn’t get it in the corners, and you can see it if you look closely, but I don’t really care too much.