Workshop and Woodshop Design – The Truckee Workshop Garage – Part 1
We live near Lake Tahoe, California in a town called Truckee. When we bought the house it didn’t have a garage, and I was perfectly fine with that. I knew I wanted to have a custom workshop, and it offered a blank slate for me to come up with something I desired. Little did I know how much of a rabbit hole this would have me going down.
I started with the rough location of where to build. The best location was right next to the main house at the end of our driveway, and the previous owner had made it somewhat flat. When I say flat, I mean big enough for a basic two car garage, which was the prior owner’s intent at some point. Our 20 acre property is rather sloped, which would make it difficult to build a slab-based structure without some serious digging. We needed a garage for the snowy winters to put our car, and I wanted the shop area to be attached behind the garage. I decided on a rough size of 30′ wide by 60′ deep; this size seemed like I could reasonably fit it into the area with a two car garage in front, and a workshop area behind. I also thought it wouldn’t require a lot of excavation and backfilling.
I still use the free desktop version of SketchUp Make 2017 [version 17.3)] on macOS and did some initial design layouts. I decided to break the building up into three areas.
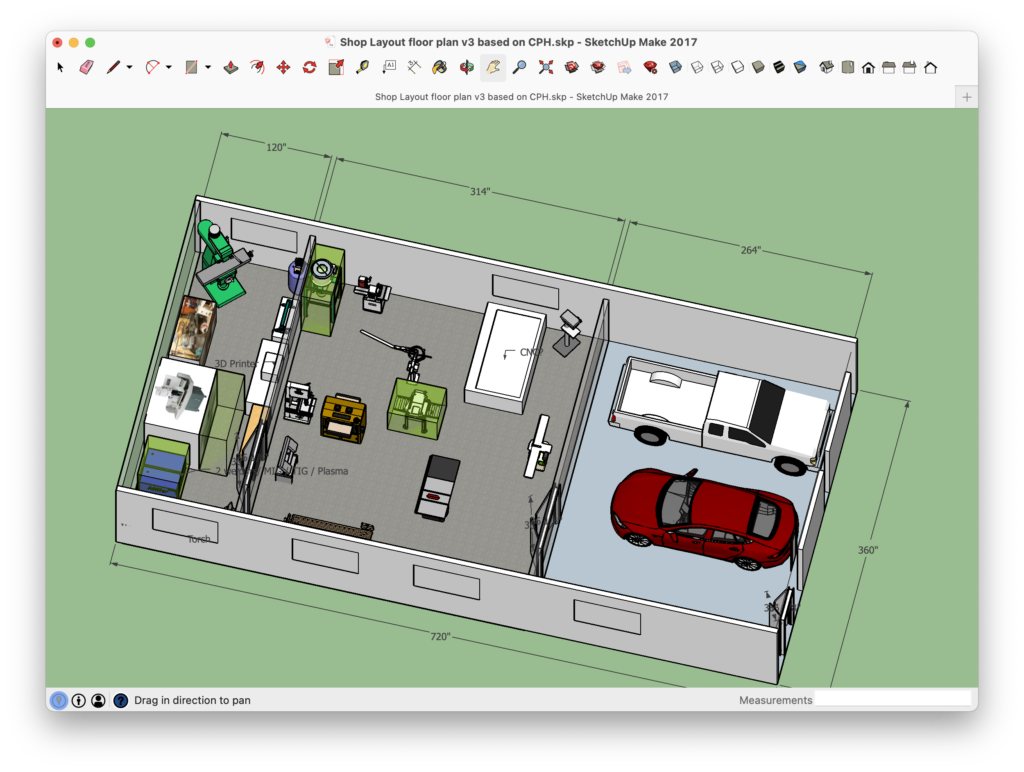
The front of the building would be the two car garage portion around 22′ deep. I thought this would be deep enough for my Ford F250, but now I realize I should have used a different model in my design and my truck won’t actually fit. This isn’t too big a deal as I figured I would likely park it outside in the winter with the plow on.
The middle part is the main wood workshop. I placed machines roughly where I wanted them, and left enough space around them for handling large pieces of wood. I actually drew the spacing in SketchUp itself and made it a semi-transparent green color:
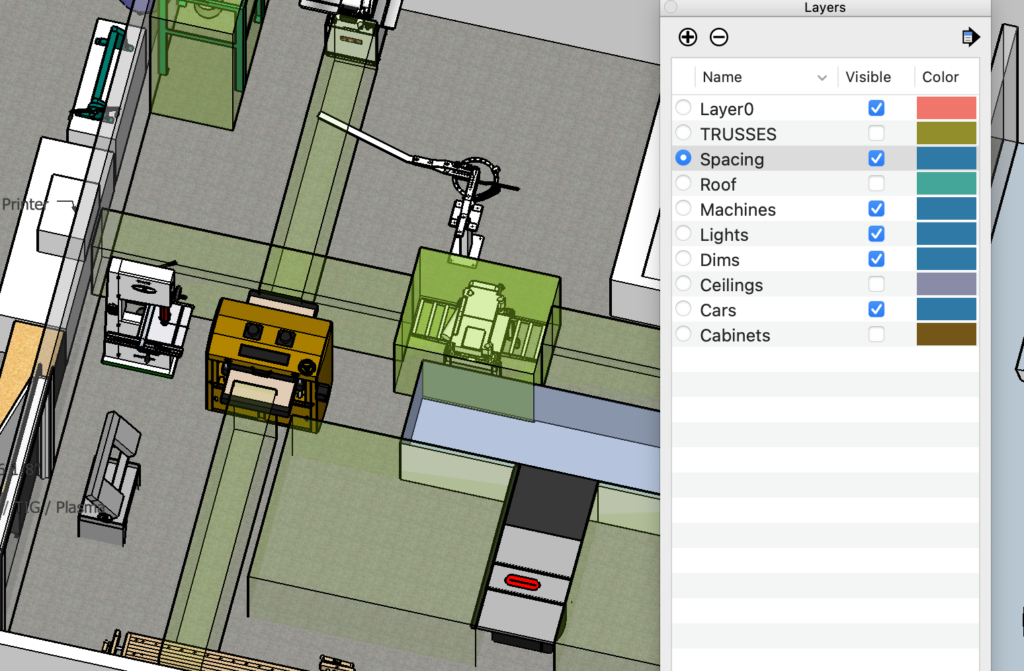
I put the spacing on its own layer. This allowed me to easily turn it on and off to make it less cluttered. The machines are also on their own layer for the same reason.
Some of the spots are actually for tools I don’t have, such as the large wood CNC machine. I wanted to make sure I could expand in the future if I wanted to However, it may not be possible to get a large 4×8 CNC router into the location as the doors into the shop may limit me. I’ll talk a little more about this later and why it is this way.
The back area is the metal machine shop. My plan is to put my Enco knee mill in the corner with the Southbound lathe to the left of it. My Tormach PCNC 1100 might live back there or in the main area, depending on how I end up using the machine (wood or metal). It’ll also house my welders: the Miller Synchrowave 250 TIG welder, plasma cutter, and my Matco tools MIG welder. The back area also might work out to be a finishing room in one corner. I’ll see how this pans out in practice once I start using the shop.

I figured the air compressor would do well in the back room to help keep the main area a little quieter.
Once I had a design in mind I had to figure out how to get plans to build it.
Continue on to part 2, where I discuss how I got my plans.
View all the posts chronological order: The Truckee Workshop Project 2021


Nice start to planning. I am too looking at building a shop in about 6 months. I had same problem with a long truck that’s 22 ft long.
question for you is where are you going to store your material?
Cool! I’m actually pretty far along with the building; I need time to make some more detailed blog posts.
For wood storage: there will be storage above the right “garage” side and the left “metal shop” side; currently it is open, so I’ll have to build some stairs or use a ladder to get stuff up and down. It probably isn’t ideal for large pieces of wood, so bigger stuff I’ll store vertically leaning against one of the walls. The center area is open and vaulted for this reason.
[…] Previously, I discussed some of the initial workshop layout in part 1. […]