Corbin's Treehouse - Corbin Dunn, Santa Cruz, CA
Plug Bug
Treehouse
Photography
Videos
Projects
Unicycling
About

Archive for May, 2012

Plug Bug: It breaks, I fix it.

Wednesday, May 30th, 2012

Last weekend my car suddenly shut off all power while driving home. It happened again this morning right as I was going to drive away. I could jiggle the key and it would come back on…but this seemed hokey, and unsafe (especially after my last stall on highway 17 due to a huge pothole and my inertia switch flipping). I realized the short was in the wires heading into the ignition switch, as I could jiggle them and it would turn the car on and off. I took the steering column apart and realized it was this little thing that went bad:

IMG_8029.jpg

It is what gives the car 12 volts when it is “on”. I went to Bugformance at lunch and got a new one and installed it in about an 1.5 hours. I was really curious why the old one failed, so I popped it apart (which sort of broke it, which is why I had to get a new one):

IMG_8031.jpg

It is hard to see, but in the above picture the copper contacts complete the 12v circuit when the car is on, and the contacts were literally worn away from the key being turned on so many times. In fact, the little copper plate was about half as thin as it normally should be at the locations where the contacts make contact. Inside the little housing it looked rusty, but it turns out it wasn’t rust but simply worn away copper dust.

So, after ~320,000 miles, the car’s ignition module wore away. Not too surprising for a car this old.

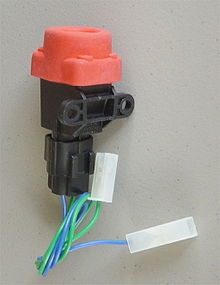
Plug Bug: The Inertia Switch works

Wednesday, May 30th, 2012

The electric bug has an inertia switch in the case of an accident. It looks like this:

201205302123.jpg

It is designed to cut the 12v system to the rear of my car, which turns off the controller and high power contactors, thus cutting power to the motor controller in the event of an accident.

It turns out I discovered it works. They are doing a lot of work on “highway 17″ to Santa Cruz and I hit a really big pothole a few weeks ago. It jerked the car enough to make it stop, which was bad, as highway 17 is a crazy twisty fast road. I had stopped going uphill, and luckily it wasn’t a blind corner, and cars just went around me. I was poking around the car trying to figure out what was wrong, and finally called AAA to get a tow. While on the phone with the lady I remembered about the inertia switch, and sure enough, it was tripped.

So, a lesson learned: If my car stops and the “key on” doesn’t turn on the car, then it might be the inertia switch. I guess it was a good test to verify it works…but not a fun location to have it happen on. Oh well!

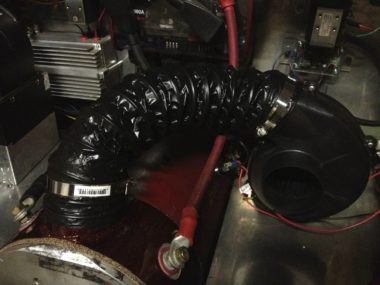
Plug Bug: Blower install on the motor

Monday, May 28th, 2012

The bug’s motor runs pretty hot on hot days. You can’t keep your hand on it for more than a brief instant. I have measured the temperature with an infrared thermometer, but of course, right now I forget the values. I know that it was well below the values for the motor’s casing temperature, but more than one person has told me that running the motor cooler will prolong its life.

So, I finally decided to install a blower. evsource has this electric motor blower kit for $448, which is quite pricey. I figured out they use a rather weak 105 CFM “squirrel cage” motor. I discovered that Jabsco makes quite a few DC blowers. They all suck because they are too loud, but I figured mine would only run when the motor was hot, so it wouldn’t be too big a deal. Most people run them all the time, since it is easier to wire up, but I hate the noise when the car is fresh and cold (and the waste of energy).

I bought a 150CFM one from on ebay for $80 (plus 15 shipping): Jabsco DC 12V 150 CFM Flexmount 3″ Blower – 36740-0000. I have a feeling it will fail in 3-4 years, since this model (actually, all the ones rated under 250 CFM) aren’t rated for continuous use. Jabsco says you can use them continuously, but they have a lower life span than their “heavy duty” blowers which are made for continuous use.

IMG_8024.jpg

I had some think steel flat stock laying around, so I took it cut a piece about 3.5″ wide off with the plasma cutter:

IMG_7989.jpg

I measured the circumference of the motor and cut it down to length; note, if you are doing this, add an extra 2″ for the tabs that will be bent at the end.

IMG_7990.jpg

I scribed a 3″ circle in the center and cut it out with the plasma cutter. Same goes for some holes for the terminals.

IMG_7991.jpg

I rolled it on the slip roll to the shape of the motor, and also made a smaller 3″ diameter one for the blower inlet:

IMG_7992.jpg

I flattened the bottom; this would have been easier to do before the slip roll:

IMG_7993.jpg

TIG welded it all together:

IMG_7995.jpg

Then I cleaned it up with a dremel and grinder. I used my cheap harbor freight bender to bend the ends:

IMG_7999.jpg

I drilled them out for 1/4″ bolts (using two).

From Amazon, I ordered some cork gasket ($15), 3″ marine hose ($10), and clamps ($10). (total cost for this project: $130, including about $15 in shipping).

The gasket I glued onto the back with some hi strength adhesive:

IMG_8025.jpg

and then trimmed it to fit. Oh yeah, first I had powder coated the thing sparkly red:

IMG_8026.jpg

I drilled and tapped a few mounting locations for the blower, and set it all up:

IMG_8027.jpg

The blower comes on in two ways. The first is a switch I have mounted in the cabin so I can turn it on when I want (i.e.: going up highway 17). Second is a 50 C snap switch.

(digikey.com: 317-1512-ND THERMOSTAT 50 DEG C N/O FASTON). I also bought a 60C and 70C switch, in case it comes on more often than I want.

IMG_8028.jpg

I’ve only driven the car a few times with it. In a cool morning, it didn’t come on at all on the way to work (the motor was cool), and on the way home it did come on and seems to vacate a lot of hot air. Awesome.

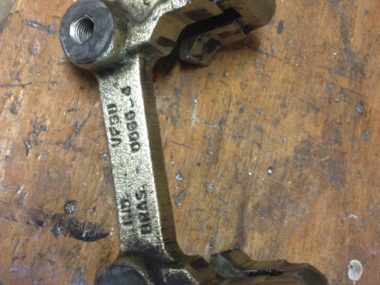
Plug Bug: Broken brake…

Saturday, May 5th, 2012

…well, problems come in pairs. I changed my front brake pads about about 8600 miles; they wore away quickly! I didn’t change the rear, as they weren’t as bad as the front. I checked the new front ones at 15,000 miles and they are doing great. I had looked at the rear but only on one side and without taking the wheel off. They looked okay, so I wasn’t going to do them yet. However, the rear brakes started making a horrible noise last Friday.

So today I decided to take the brakes apart and drop in the new pads I already had on hand. It turned out to be an all day adventure. The left pads were worn, and it was time to replace them, but they weren’t totally shot. The right rear wasn’t in such good shape. Of the two pads, the left pad wore twice as fast, and was starting to etch into the disc! Doh! It wasn’t that bad, and I’m not going to replace the disc, but I had some trouble with installing the new pads. First of all, the pistons on the calipers were not wanting to go back in. I had to force them in with a pretty large C-clamp, and even then it was a lot of effort to get them in. Then I encountered the “problem”.

I have the rear disc brake conversion kit from CIP1. It is this one. It turns out one of the bolts that moves in and out to let the brake adjust was seized. So instead of moving as the pads wore, it just stayed put, and caused one side of the pad to wear twice as fast as the other! Worse, it was impossible to get off. I tried lots of things, including heating it with the torch, but it wasn’t budging. I put a bolt in and tried to get it to move…but that was a bad idea as the bolt snapped right off! That made things worse. I took the piece off the car and worked it in my vice and finally got it out.

In the picture below, the bottom right hole is where it was stuck; I managed to get it out by working it in a vice for a while.

IMG_7967.jpg

The stuck piece freed:

IMG_7968.jpg

Apparently some water got in the hole and let things rust up nice and bad. The sucky part is that I broke the bolt off in the piece:

IMG_7972.jpg

..and easy outs (bolt extractors) *never* work for me. So, I of course broke one off in it.

I wasn’t sure what to do. I could order a new caliper (i.e.: this one). for $120 plus shipping, and wait a week to get it…but I don’t want to do that as it means week of not driving and I also have a car show to go to next Saturday! Instead, I decided to machine my own piece. So, after some time on the lathe and mill I had a replacement.

In the picture below, the top is the broken piece, the middle is the good piece+bolt, and the bottom is what I made. After the picture was taken, I quenched it in oil to harden it (note to self: don’t do it in a plastic container).

IMG_7973.jpg

The finished piece is on the right, and the material I used is the big lump of steel.

IMG_7974.jpg

My short test drive seems to let the brakes work! Cool…it only took all day (~10am to 8pm). And I missed hanging out with my friend Nathan for his birthday! Doh…

Plug Bug: Running again!

Saturday, May 5th, 2012

An update to the last post: The bug is running again! George, from Netgain motors, suggested seeing if the motor had excessive vibration. When I ran it at 12volts it seemed to hum pretty fine, so I put the car back together. It took a while, but I was running again by last Wednesday. I can’t really tell if the motor has any excessive vibration; it sounds a little different when I put in the clutch, but it doesn’t sound out of balance. So, I’m going to go with it!

Oh, and the little pieces that came out of the motor was balancing putty.

However…I ran into more problems with my rear brakes (next post..)


(c) 2008-2012 Corbin Dunn

Corbin's Treehouse is powered by WordPress. Made on a Mac.

Subscribe to RSS feeds for entries and comments.

14 queries. 0.935 seconds.